User Guide to ECE Linux Environment
Software for Personal Computers
Download and Install v2 clients
Remote Access to Teaching Labs
Patching and Installing Software
Accessing from NonECE computers
Using Singularity and Containers
Don’t Start in Anaconda by Default
Appendix A: No Tokens at Login (GSSAPI issue):
Appendix B: Standard Dot Files
Environmental Changes
- “Rm” will no longer prompt for confirmation by default
- Ctrl+d to log out works now, instead of "use logout to logout"
Software for Personal Computers
Before you remote in, first check to see if the software you need is available to be installed on your personal computer:
https://docs.google.com/document/d/1bXHRtLWIxh4GP49GUU4r6Ldxpg5vydbrP4fxtPgCRiU/edit#
Remote Access
First, if you're offsite, you must have an active VPN connect to talk to any ECE computer. https://vpn.ncsu.edu. Please see https://go.ncsu.edu/remote if you need a walkthrough on using the VPN client.
Second, you have two options to access an ECE Linux computer -- ssh or FastX. Remember to use the full name of your computer -- computername.ece.ncsu.edu
For ssh, I recommend that you install this free client on your windows computer: https://mobaxterm.mobatek.net/download.html. The campus HPC also provides information and instructions for this client: https://projects.ncsu.edu/hpc/Documents/mobaxterm.php
If you’re using a personal MacOS machine, then you can use the built in “terminal” application to ssh to another machine. But if you want to X terminal back to your local machine, however, you will need to have XQuartz installed. You can download this from https://www.xquartz.org/. Start the application and right click on the icon in the dock, selecting Applications>Terminal. This should bring up a new xterm window. From here, ssh into the remote linux system using the -X argument (secure X11 forwarding). For example:
ssh -X unityID@grendel.ece.ncsu.edu
Both Windows and MacOS users can alternatively can use FastX -- see below for the client download and setup (or install from Software Center if you’re on an ECE Windows computer or Self Service if you’re on an ECE MacOS system). The usage of FastX is encouraged when accessing our servers from offsite when a GUI application is used -- the protocol used by FastX is superior to ssh over WAN networks and will result in a faster remote experience.
Details on the setup and usage of ssh can be found on https://go.ncsu.edu/remote
If you need to transfer files, we recommend Filezilla (Win/Mac), Cyberduck (Mac) or WinSCP (Win) as a client. SFTP must be used instead of FTP and we recommend just connecting to remote.eos.ncsu.edu if all you want to do is transfer files in and out of your AFS space.
FastX
Starnet FastX 3 is an alternative to the X-Win32 software and is WolfTech's current recommendation for remote connections to ECE department Linux servers.
NOTE: Images on this page were taken from the macOS version of the software. The appearance may differ on other OSs, but functionality should remain the same.
Download and Install
If you are on an ECE department Windows or Apple machine, you can find an installer for FastX 3 in the Software Center or SelfService applications on those OSs.
For Linux machines or personal machines, download the installers from the links below:
- Windows: Download here
- Linux 64-bit Download here
- Macintosh: Download here
Download and Install v2 clients
We're in the process of slowly upgrading our systems from FastX v2 to v3 -- if you're specifically directed to use the v2 client, you can download them here:
- Windows: Download here
- Linux 64-bit Download here
- Macintosh: Download here
Please note that you cannot use the v3 client with a v2 server (and vice versa) so only install these if instructed.
Connect to a Server
- Contact ecehelp@ncsu.edu if you do not know what server to use.
- You must have an active VPN connection to campus before you can talk to any ECE computer.
- See the image below for how to create a connection to a server.
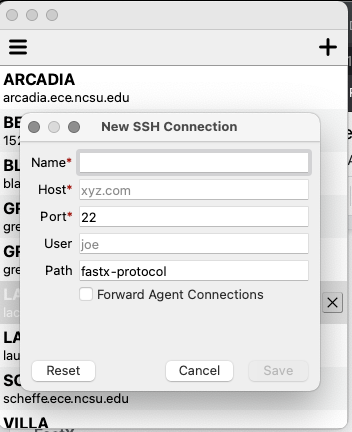
- Open FastX3 on your local machine
- For new machines
- Click the plus icon in the top right corner
- Fill out the information in the dialog box that opens up
- Make sure that you’re entering the full name of the computer -- aka, computername.ece.ncsu.edu
- Keep “Forward Agent Connections” unchecked.
- Click Save when finished
- Double click the machine you’d like to open
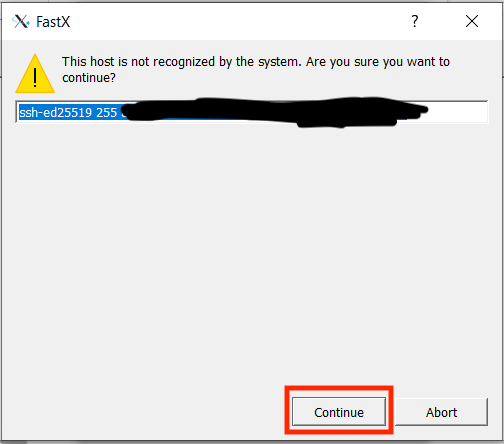
- Type in your password
- If it's your first time connecting, you may need to accept machine authentication
Open a xterm session
- NOTE: WolfTech recommends only using xterm sessions. You may use the GNOME session if you wish, but be aware you may experience lag or other issues, especially if you are connecting from off-campus. Some shared servers -- including HYDRA and GRENDEL -- will not provide the option for GNOME.
- See the image below for how to open an xterm session.

- Click the plus icon to bring up the session select menu
- Choose “xterm” and click OK.
- After the xterm launches, use as normal.
- When finished, use 'exit' to close the xterm.
- Close the connection window to end your connection to the server.
High DPI Settings
For those with High DPI displays, below is a set of instructions that can be used to increase visibility when using FastX on Windows:
- Navigate to the installation directory
- C:\Program Files (x86)\StarNet Communications\FastX 3
- Right click on FastX
- Click Properties
- Click Compatibility
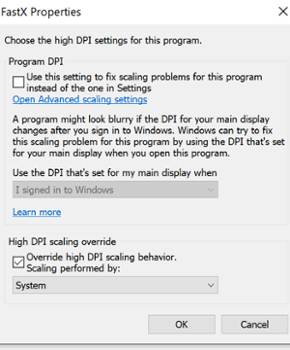
- Click Change high DPI settings
- Make sure that the checkbox is unmarked for Program DPI "use this setting to fix scaling problems..."
- Make sure the checkbox is marked for "High DPI scaling override" and set the scaling performed by: "System"
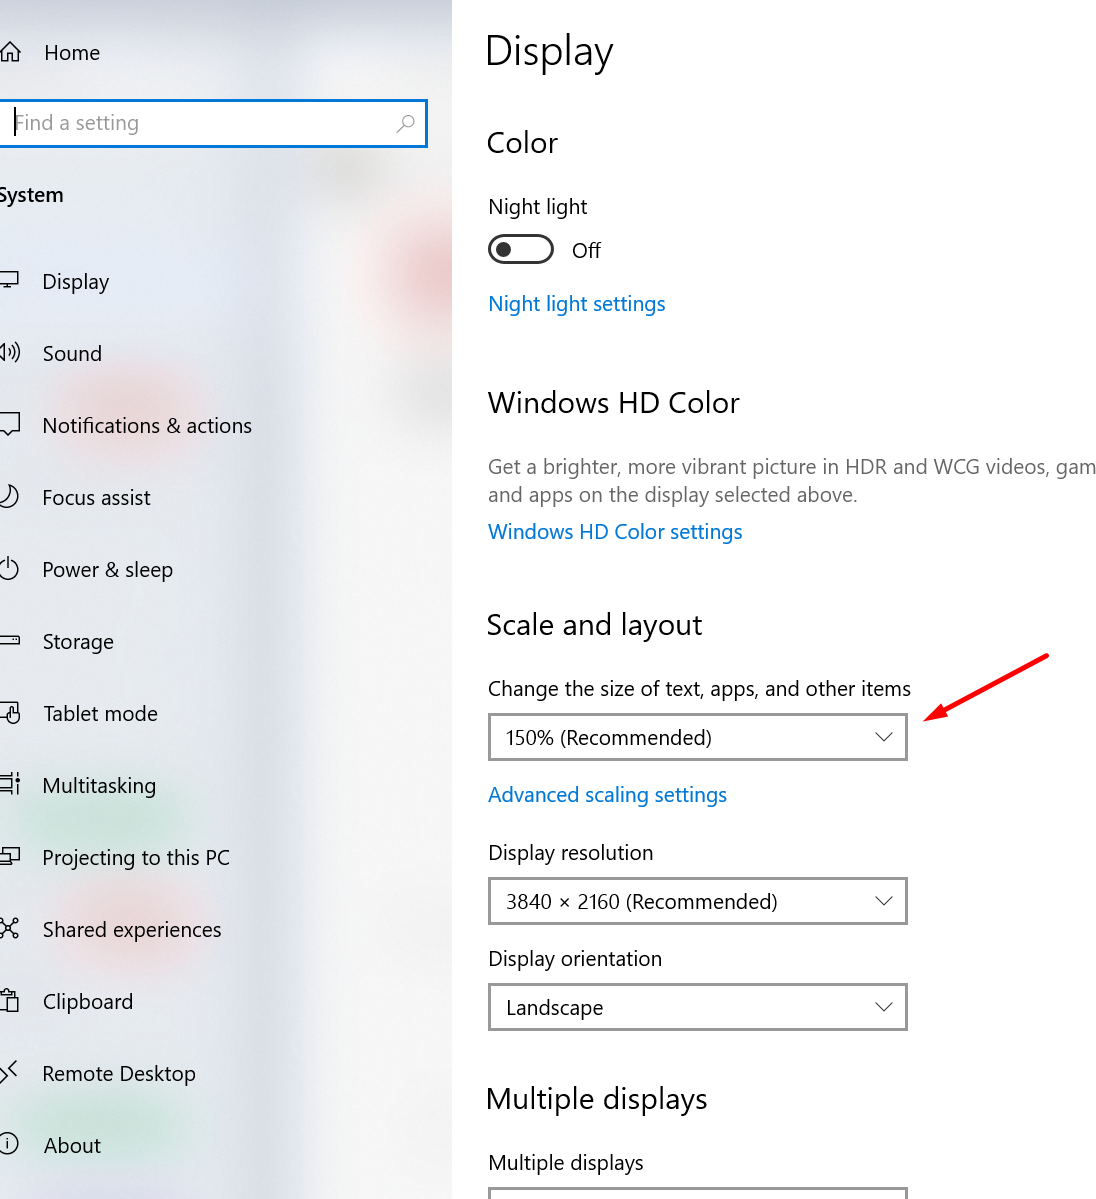
It should now scale with your windows display settings for "Scale and layout" -- go to Settings, System, Display, and here you can select to increase the size of text and apps. In the example below, you’ll see where these have been increased to 150%.
Using this method may result in the text or icons being displayed a bit fuzzy. You should experiment to see what scale works best for you.
Gnome Classic Mode
If connecting to a system via Gnome is permitted, you might want to make use of the classic mode of the Gnome interface. If so, when selecting the pre-defined option for "gnome-session" change it to "gnome-shell --mode=classic" instead.
Remote Servers
The ECE department has two remote access server farms (note these are not “clusters” but collections of servers) that are open to everyone within the department. These are primarily intended for academic usage, but we’re OK with researchers also using them as long as you don’t attempt to abuse them (aka, logging into multiple GRENDELs at once).
GRENDEL.ece.ncsu.edu -- collection of approximately a dozen RedHat Enterprise Linux 7 systems with around 64GB - 96GB RAM each.
HYDRA.ece.ncsu.edu -- small farm of three GPU servers running RedHat Enterprise Linux 7 with 128GB of RAM and dual Nvidia Titan Xp GPU cards in each.
Both GRENDEL and HYDRA systems support FastX3.
Should you be working for a particular researcher, you’ll also be able to gain access to any research servers specific to their group. These will generally be more powerful, will provide local storage, and will certainly have less users sharing them. If you have access to one of these, we ask that you make use of it instead of the GRENDEL/HYDRA systems as our course resources are limited.
Each of these clusters are rebooted Monday morning.
Remote Access to Teaching Labs
With access to the teaching labs being revoked, we’ll be permitting remote access to the ½ of the computers in the 1014 and 1028 EB2 teaching lab to help offset the load on the GRENDEL servers. We recommend the usage of FastX to access these systems from offsite.
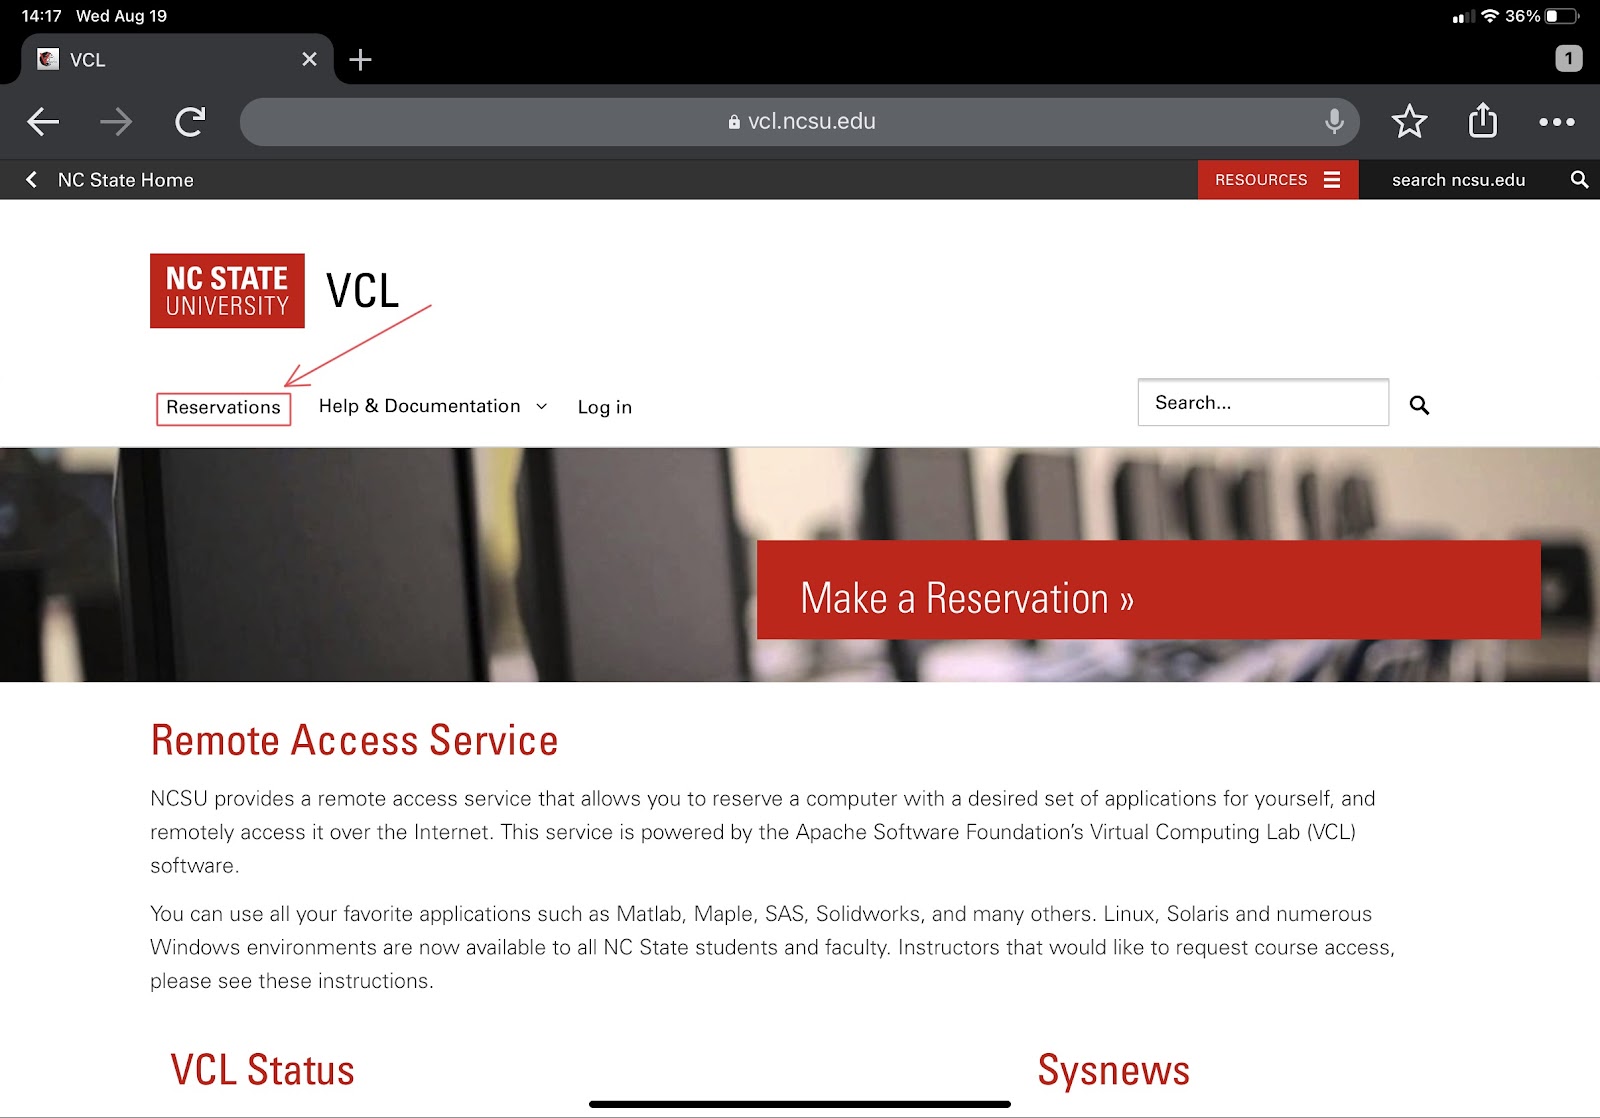
We have added these to a VCL checkout / reservation system. You will need to visit https://vcl.ncsu.edu/ in order to reserve time on these machines for use. Only one student per workstation will be permitted.
Click “Reservations”
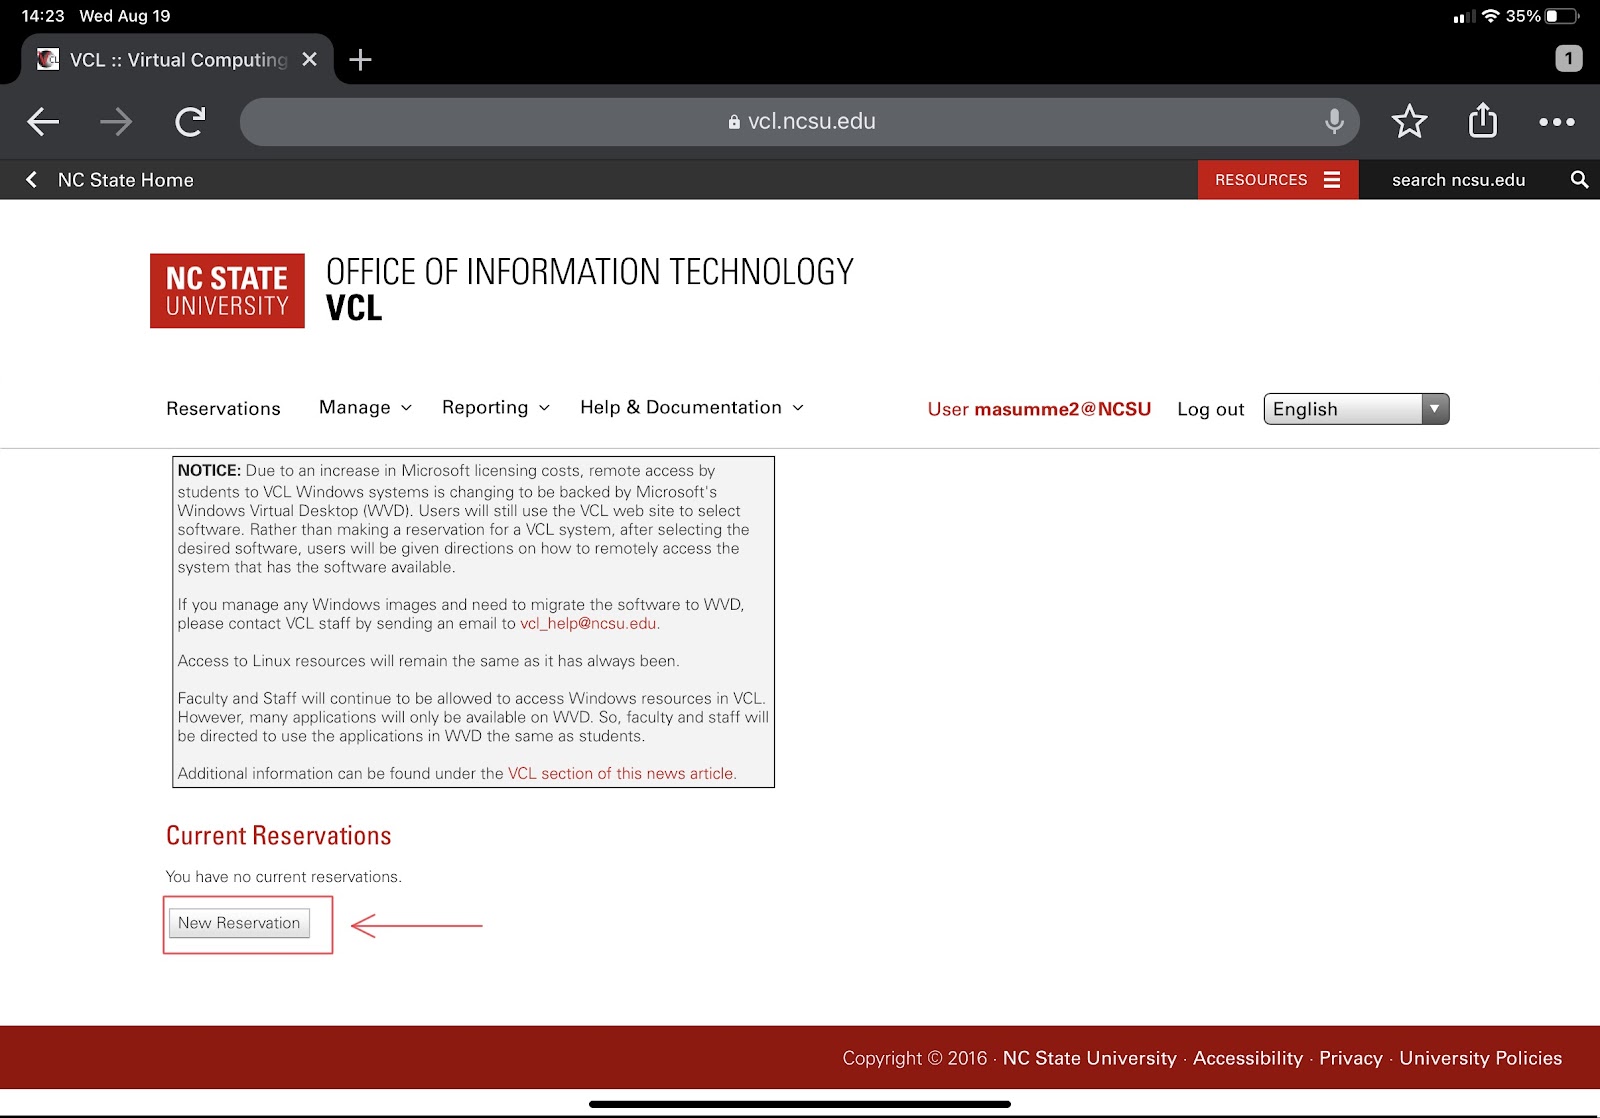
Click “New Reservation”
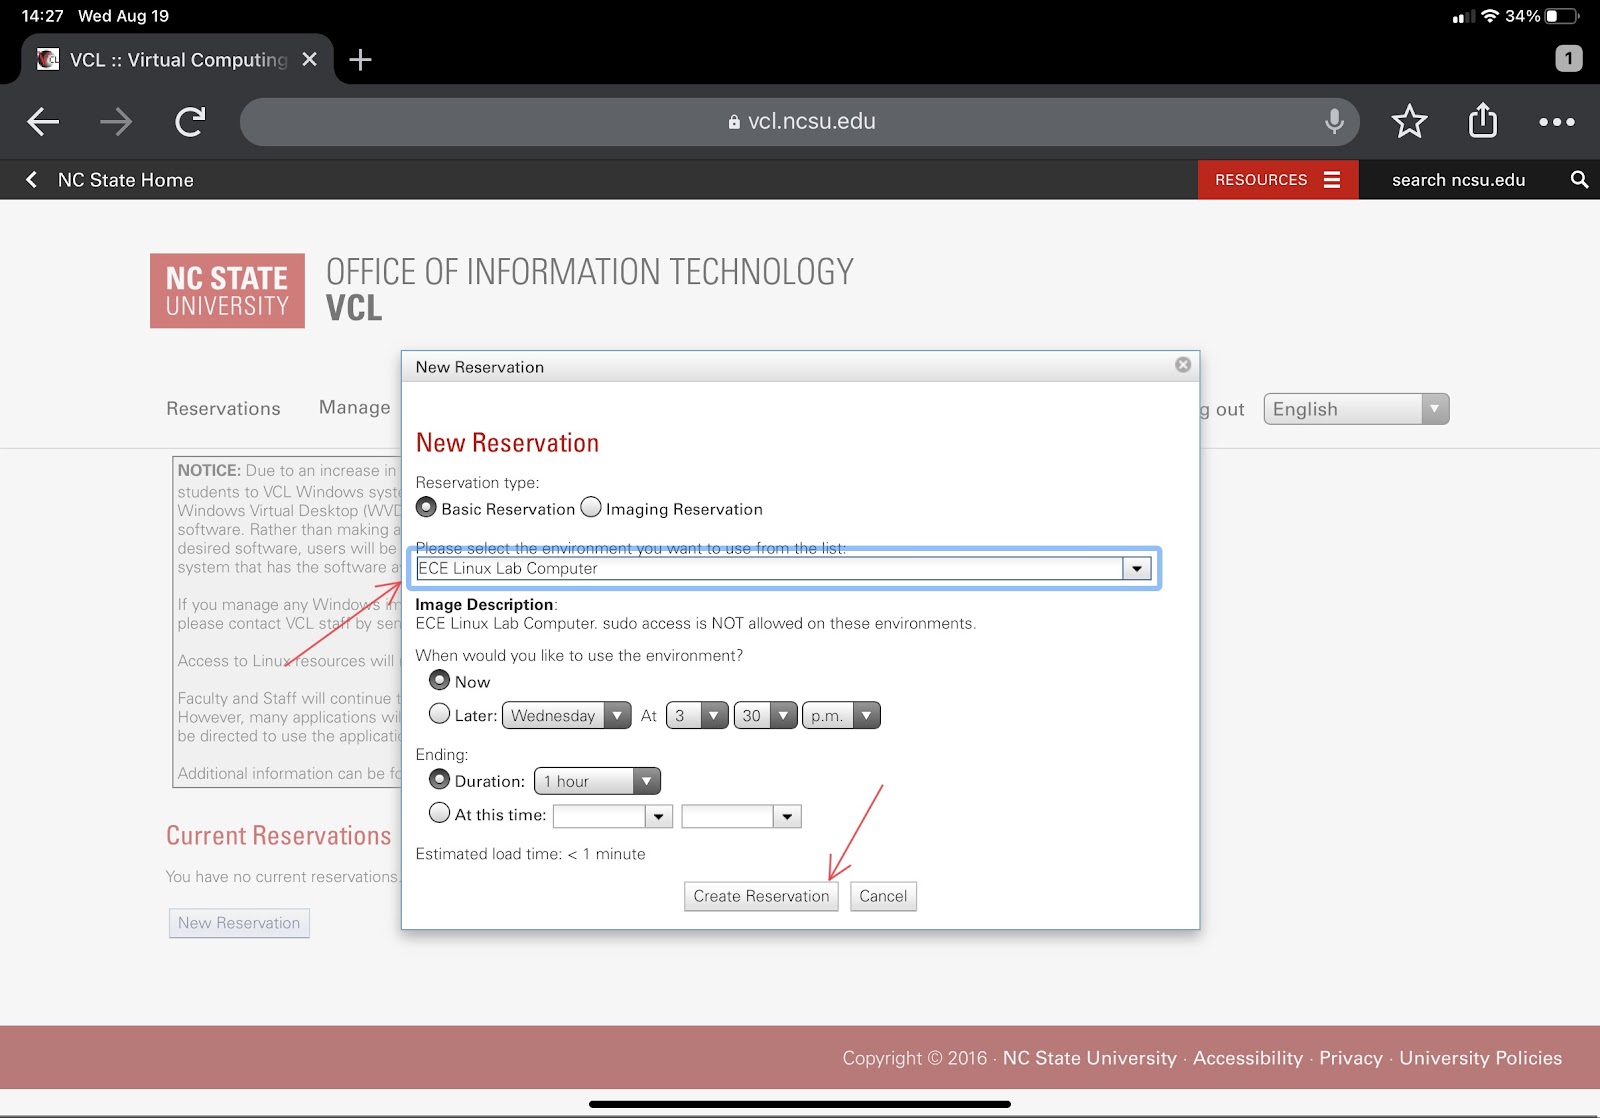
When the “New Reservation” window opens, please select “ECE Linux Lab Computer” from the drop down menu. Then, click “Create Reservation”
After clicking the button, wait a couple of minutes. You will then see two buttons and a drop down menu along with information about the lab machine.
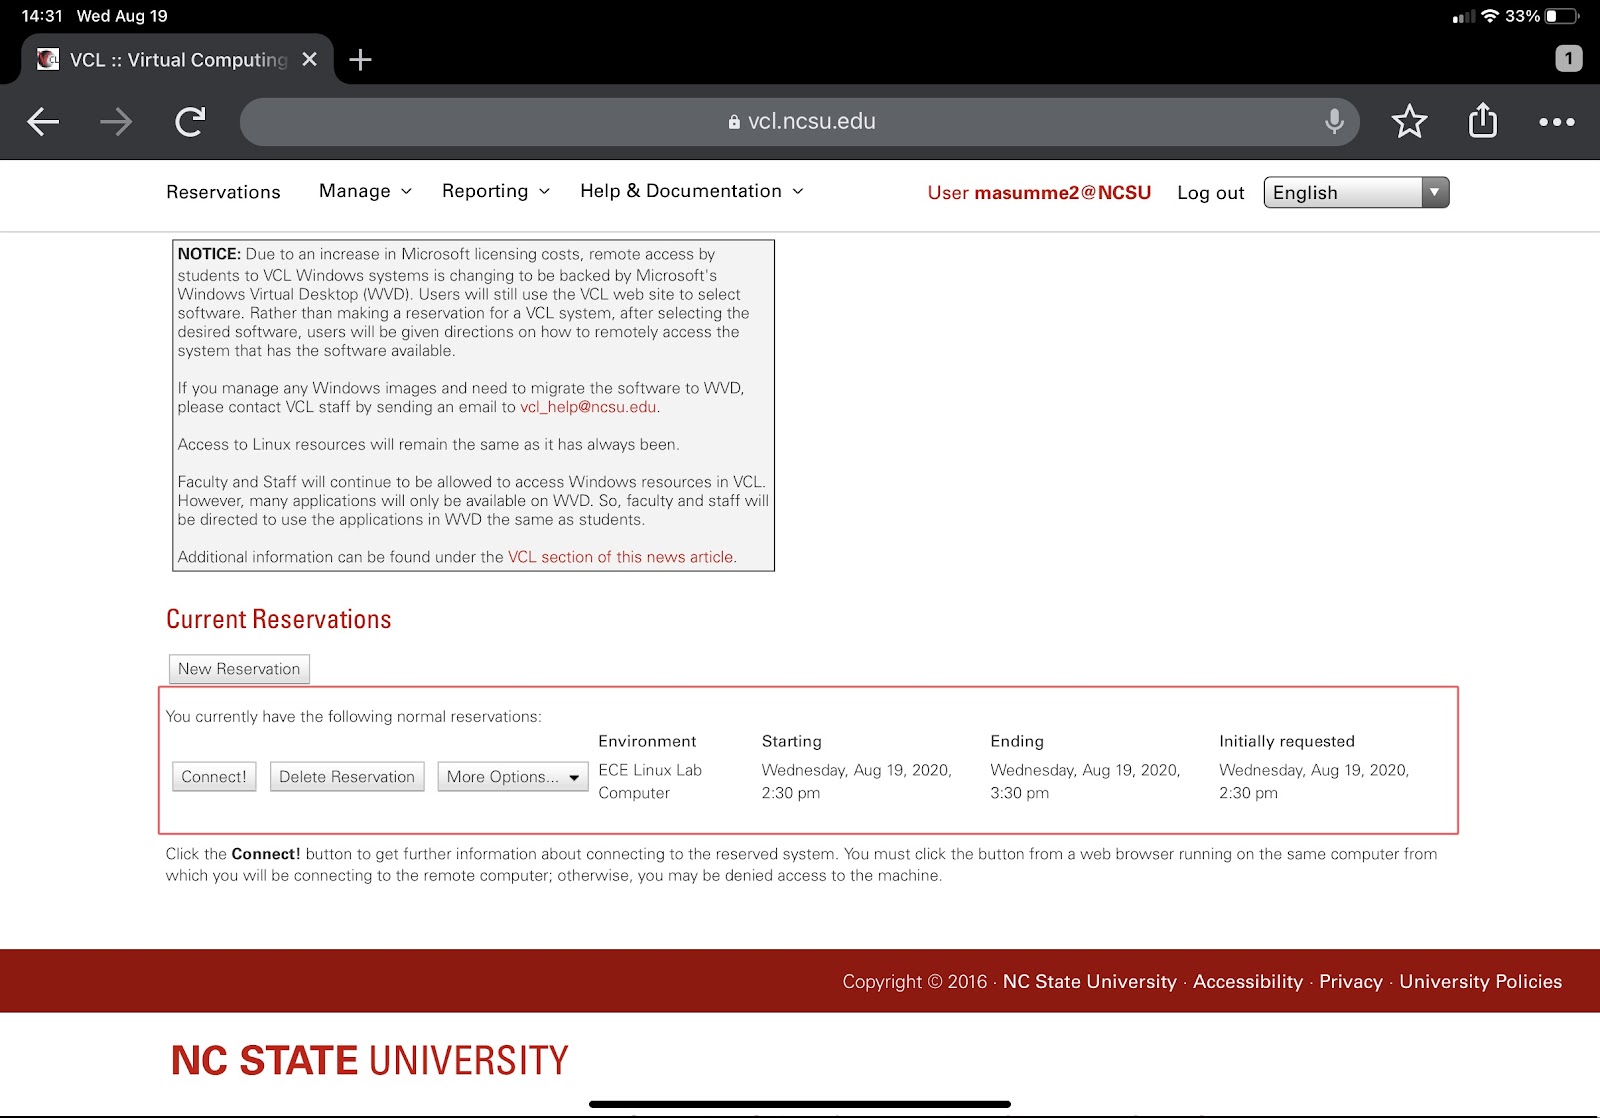
When you click connect, another window will pop up with information on how to connect to the machine.
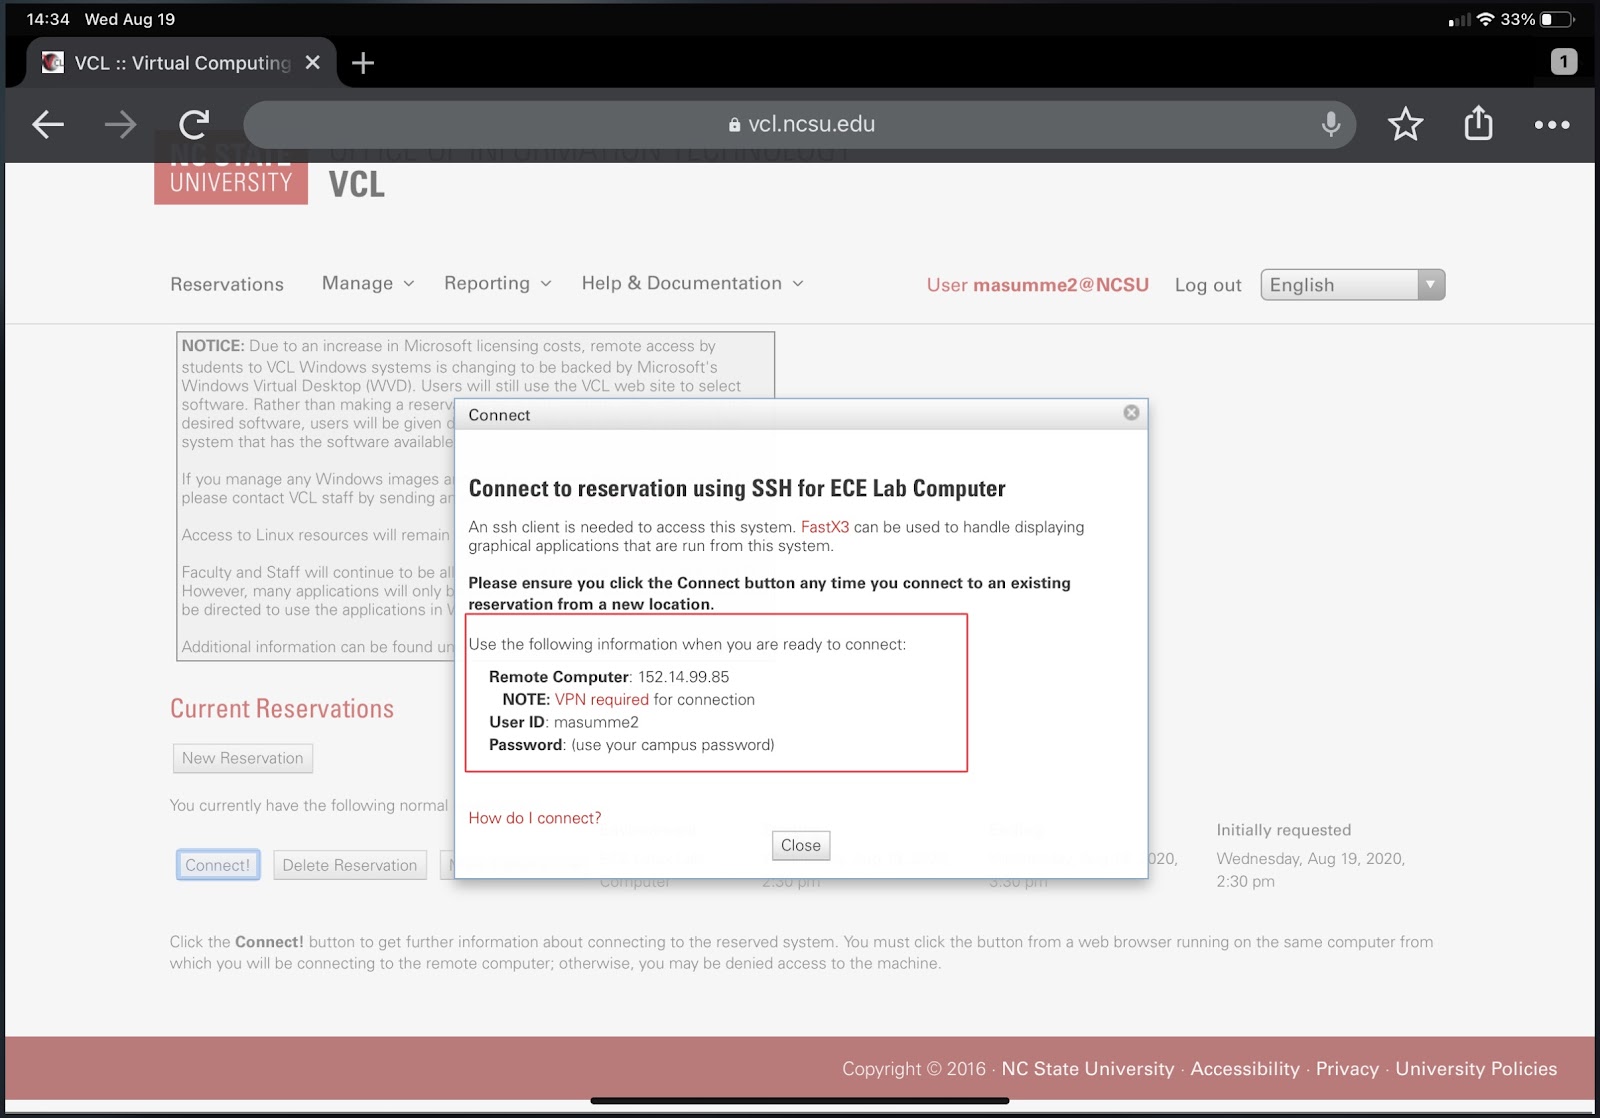
We recommend that you follow instructions on how to connect to Linux machines as outlined in our Working Remotely document, but some quick highlights:
- You must have a working VPN connection to vpn.ncsu.edu to connect to our systems remotely.
- You can use ssh or you can use FastX v3 to connect to these systems -- we recommend FastX as it will provide a smoother connection from off campus: https://go.ncsu.edu/fastx
- Remember that these are standard ECE Linux systems -- so revisit our documentation at https://go.ncsu.edu/ece-linux
In addition to our ECE teaching labs, the College of Engineering has also added their workstations to VCL in this manner -- you can access them with these “image” requests:
- “Eos Linux Lab Computer”
- “Eos Linux Lab Computer with GPU”
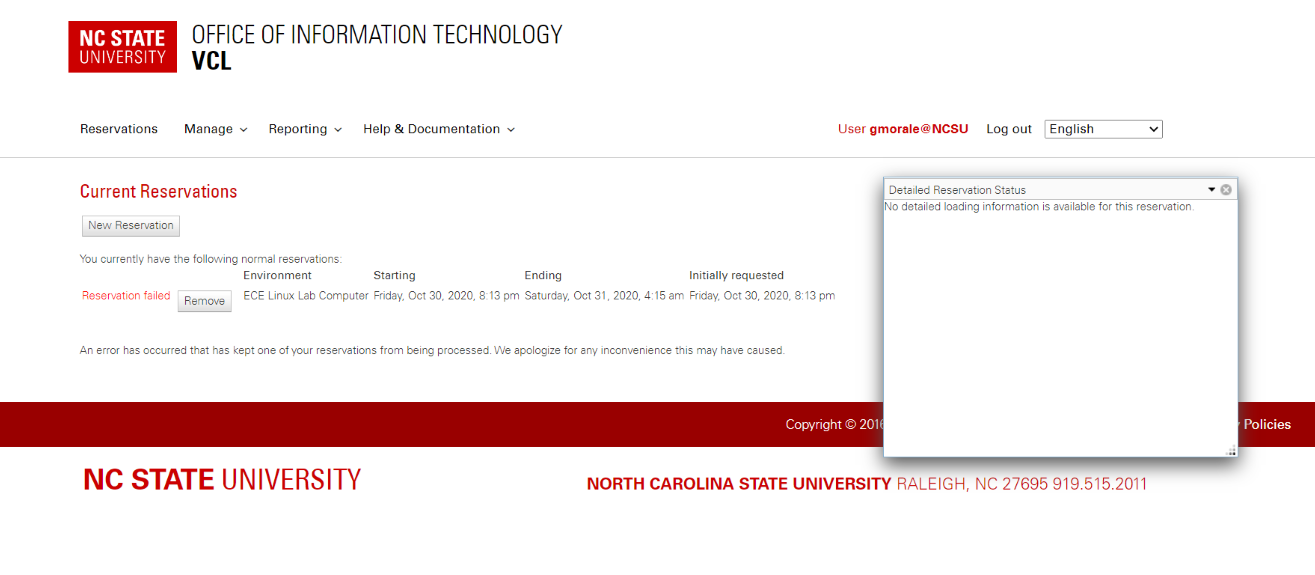
If you see an error similar to this one where the reservation has failed...
Then most likely, the individual computer that VCL is trying to check out to you is having issues. When this happens, VCL makes a note and skips that computer until its fixed. So remove your reservation and try again -- a different computer should be selected for you.
No Password?
Sometimes when you login to a Linux box, you’ll note that you were not asked for your password… The new Linux machines are using Windows Active Directory for their authentication provider. The same as all of our managed Windows boxes.
For this reason, when you connect to the Linux machine, it will often recognize your security tokens on your desktop and immediately authenticate you to the Linux machine. This will only work on our managed systems.
There are times when this won't work for various technical reasons or due to the configuration of the ssh client you're using, but yes, this is to be expected now in the new Linux environment.
(this doesn't mean that everyone can login to the machine)
3/1/2019 UPDATE: turns out this will cause issues with your AFS tokens… see Appendix A for the resolution.
Home Directory
On most research workstations and research servers, users may now find themselves using a local home directory (/home/username) instead of your AFS home directory (/afs/unity/users/u/unityid). We're working to slowly move our systems away from their dependence on AFS -- this is one of those steps.
Exceptions to this will generally be teaching lab workstations and the remote access clusters (hydra.ece.ncsu.edu, grendel.ece.ncsu.edu, remote.eos.ncsu.edu, for example).
You can still access your AFS homespace by "cd /afs/unity.ncsu.edu/users/u/unityid/" - and yes, plain "cd" will now bring you back to your local HOMEDIR -- which on the machine is /home/unityid/
You could create yourself an easier path...
cd
ln -s /afs/unity/users/u/unityid/ afshome
This will create a symlink (will look like a folder) in your local home to your AFS home that will save you some effort when you need to access those files.
Patching and Installing Software
We've been updating the defaults permissions we push out with our research Linux workstations (this does not apply to our teaching labs nor GRENDEL/HYDRA farms) to allow our users some more control over their workstation without having full administrative rights.
You now have the ability to run the following cmds as admin on the box from terminal -- "apt-get" and "reboot".
In particular, you'll now have the following functions:
## useful to run prior to updating packages
sudo apt-get update (Ubuntu)
## will attempt to install all updates and packages
sudo apt-get upgrade (Ubuntu)
## will immediately reboot the system
sudo reboot
## will install package if available on a repo configured on the system
sudo apt-get install package (Ubuntu)
Sudo yum install package (RHEL)
## be careful with this one
sudo apt-get remove package (Ubuntu)
Sudo yum remove package (RHEL)
We don't currently patch research workstations on a schedule. I'd like to, but doing so in a way that doesn't disrupt your research is difficult as a reboot is always advisable after patching a computer. So we rely on our users to do this.
Ubuntu is pretty good about telling you when you have pending patches. We'll be seeing what we can do on RHEL to make it similarly obvious.
When you see that there's pending patches, all users of the box -- if you're on a multiple user box, please be sure to coordinate with the others so you don't disrupt their work -- can now run the following to patch their system:
(on Ubuntu)
sudo apt-get update
sudo apt-get upgrade
sudo reboot
(or on RHEL)
sudo yum update
sudo reboot
If you’re asked questions during the patching, accept the defaults. You’ll sometimes see a question related to the AFS client, for example. Just click enter to accept the default selection.
AFS
AFS is still installed on most systems so you can access this file service when needed. In addition, the renewal of AFS tokens has been improved and should happen automatically (no more having to use kreset -l before overnight jobs are run).
- Every 10 minutes, a daemon (krenew) running on all of your machines “wakes up” and extends the Kerberos TGT and then runs “aklog -force eos unity bp”.
- The AFS token lifetime is based on Kerberos service granting tickets - you effectively have AFS tokens for as long as your TGT can be renewed. Currently 7 days is set as the default.
- Due to recent changes to the WolfTechAD domain controllers, we have the ability to set 32 day renewable Kerberos tickets as a client default. If you have someone right now that wants a 4 week job to run, they simply run:
kinit -l 24:00 -r 32d; aklog eos unity bp
You can check your tokens at the cmdline:
tokens
klist
Both of these cmds will show you your active kerberos tickets. You want to see something like:
[djgreen@grendel1 CONFRML181]$ klist
Ticket cache: KEYRING:persistent:43775:krb_ccache_VkSkoBu
Default principal: djgreen@WOLFTECH.AD.NCSU.EDU
Valid starting Expires Service principal
10/17/2018 17:45:05 10/18/2018 07:45:05 afs/bp.ncsu.edu@WOLFTECH.AD.NCSU.EDU
renew until 10/24/2018 17:44:04
10/17/2018 17:45:05 10/18/2018 07:45:05 afs/unity.ncsu.edu@WOLFTECH.AD.NCSU.EDU
renew until 10/24/2018 17:44:04
10/17/2018 17:45:05 10/18/2018 07:45:05 afs/eos.ncsu.edu@WOLFTECH.AD.NCSU.EDU
renew until 10/24/2018 17:44:04
10/17/2018 17:45:05 10/18/2018 07:45:05 krbtgt/WOLFTECH.AD.NCSU.EDU@WOLFTECH.AD.NCSU.EDU
renew until 10/24/2018 17:44:04
If you don't, then you need to renew these. You can do this manually with this command:
kinit;aklog eos unity bp
Now try checking your tickets again.
Your AFS tokens are supposed to auto renew, but sometimes this doesn’t occur if you’ve not logged out or rebooted your computer in a while. In addition, we’ve found the auto renew to not work as well on Ubuntu systems.
NFS
Determining Permissions
First you need to install nfs4-acl-tools (installed by default on ECE computers)
> yum install nfs4-acl-tools
You can useThen you can look at the NFS permissions:
[djgreen@mrblonde designkits]$ nfs4_getfacl gf022
# file: gf022
A:fdg:WOLFTECH\oit-rs-share-designkits@WOLFTECH.AD.NCSU.EDU:rwaDdxtTnNcCoy
A:fdg:WOLFTECH\ece-acl-dk_gf022-rd@WOLFTECH.AD.NCSU.EDU:rxtncy
A:fdg:WOLFTECH\ece-acl-dk_gf022-wrt@WOLFTECH.AD.NCSU.EDU:rwaDdxtTnNcy
Accessing from NonECE computers
When attempting to access the campus research data stored on the NFS servers, you’ll find that we already have this mounted on all ECE Linux systems (/mnt/research-faculty and /mnt/research-projects) and all ECE computers have already been whitelisted for access.
NonECE computers -- and in particular personal computers -- must first be connected to the campus VPN service to access the research data servers. This includes when the laptop is onsite and on the campus wifi network. You will also need to map a drive to the specific share that you need -- you can get the path by logging into https://research.oit.ncsu.edu and reviewing the shares you have access to. If asked for a username and password when mapping the drive, use your unityID (not your email address) and password. You may need to enter your username as wolftech/unityID rather than just unityID since the system is expecting to talk to computers joined to the campus active directory environment.
Please note that prior to any of this, your professor would have needed to add you to the access list for one of their shares -- they can manage this at https://research.oit.ncsu.edu.
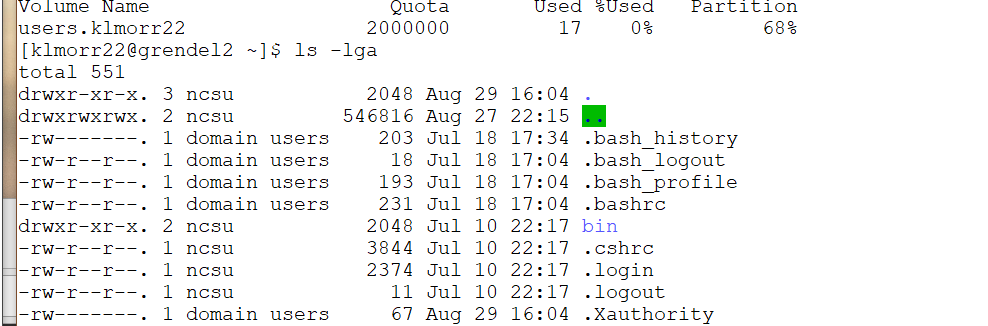
Quota
The old “quota” command is gone.
If you're in your AFS space, you can use fs lq to list the quota of the volume you’re currently in.
When on the local machine (/home for example), you have no "quota" really -- just the limits of the harddrive.
You can use df -h to see the partitions and space available/used. Look for /home to see what's there.
du -h is a good way to see what's taking up space.
du -h --max-depth=1 will limit the details to that folder and its immediate subfolders so you can tell where the space is being taken up.
Please note that if you fill your AFS quota, you will not be able to login to computers which use this space as your home directory as the login process requires that temporary files be created and this fails. Often computers in public labs, teaching labs, or remote access servers (like the GRENDEL or HYDRA clusters) will be setup this way.
The easiest way to clear some of your quota, if you find yourself locked out of Linux systems, is to use an SFTP client on a Windows machine to connect to remote.eos.ncsu.edu and delete any files from your home directory.
Remember, NCSU only provides a 10GB quota for students' home directories on the campus AFS system. Be wary of your space usage.
Default Shell
Bash is the default shell, not tcsh.
- How do you confirm your current shell? Type “echo $0”
.mybashrc will no longer be referenced at login -- use .bashrc instead
Sample default dot files are provided in the appendix for reference.
Keep in mind that your home directory on public machines (remote access servers and teaching lab machines) will remain in AFS (/afs/unity/users/u/unityid), but other machines -- personal workstations and research servers -- will be using a local home directory on the machine (/home/unityid). So your dotfiles might not follow you everywhere -- you might need to make a copy of the files (or symlink back to the ones in your AFS home directory if you like).
Need tcsh?
Typing ‘tcsh’ will switch you from the default bash to tcsh for your shell.
However, things to be aware of:
- In the new environment, if you want to customize your tcsh environment, you need to use .cshrc instead of .mycshrc
- Those of you who’ve been here a very long time might have some scary “don’t touch this file” text in this file -- if you do, just rename your .cshrc file to .cshrc.backup, create a new .cshrc file and move your cmds there.
- When creating your .cshrc file, we recommend that you include the following line that will adjust your prompt so you can visually see that you’ve changed shells:
- set prompt = "[%n@%m ~]% "
- If you add “tcsh -i” to your .bashrc file, it will automatically switch you to tcsh when you login. Do not use “exec tcsh” or you will be unable to login to the computer at the console.
The New Add
One other thing I want to point out... most of our Linux boxes --- including the teaching labs and the remote access servers -- are using the new "add" command.
The highlight of the way that the new system works is that everytime you run "add" its creating a new environment (think of it as a bubble).
For standard users, this isn't much of an issue. The only thing you'll notice is that you might need to type ‘exit’ more often when closing terminal windows.
Users who used to add two applications at once now need to combine their adds -- so this won’t work anymore:
add cadence2019
add synopsys2019
In this scenario, the user just created one env (bubble), then immediately jumped into a 2nd one (bubble within the bubble) where the variables for cadence haven't been set. Instead, you need to call the adds as:
add cadence2019 synopsys2019
This will create an environment with the variables/paths set for both applications within the bubble -- order matters as it will determine PATH and the order in which each applications setup scripts are executed.
Finally, for our more advanced researchers who have developed scripts that define a ton of variables before and after calling the "add" cmds within their scripts, they have a bit more work to make those scripts functional. See the example provided by a user below:
The command option indeed can be used to source CSH files. The only
thing is virtuoso also needs to be evoked with the source script since
command executes in place of an interactive shell. Also, the --command
cannot be a built-in shell command(like source)
The following line adds 3 lockers and sources the environment variables
after all the lockers are added.
add --command="tcsh adssetup.csh" cadence2017 calibre2017.3 ads2016.01
I had following things inside adssetup.csh
source $HPEESOF_DIR/bin/setCSF.csh #requires cadence before sourcing
virtuoso &
(I'm looking at improvements to the new "add" that might help with this -- such as allowing both post and pre scripts)
The most recent version of the “add” command no longer supports the use of the /ncsu/ path. Applications must use their complete installation path -- usually /afs/eos/dist/, /afs/bp/dist/, or /afs/eos/software -- instead.
If you have scripts that hardcoded /ncsu/applicationname into them, I’d recommend using /afs/eos/software/applicationname from now on -- we’re generally abstracting new software installs to recognize this path (regardless of its actual install location).
All of our "add" software is installed into AFS space. So you need to have valid AFS tokens to access it all. See above for commands to check this.
If add is being called from scripts or if you need cshell but you use bash interactively, (or need bash script from interactive tcsh) you should use
add.sh == bash
add.csh == tcsh
Like as in a bash session:
$ add.csh --command="some_cshell_script.csh" matlab
"add" simply tries to determine which shell you are using to decide which one to run. But you can call one explicitly if you need a certain shell language.
If you type “add ece” you’ll get a list of most of the applications we’ve installed for ECE users.
Modules
Going forward, we will be using modules as a replacement for add commands to gain access to programs on most of our Linux machines.
To see what modules are available to you, you will need to run modules avail:
[djgreen@godhand matlab]$ module avail
-------------------------------------------------------------- /usr/share/modulefiles ---------------------------------------------------------------
matlab/r2021a
------------------------------------------------------- /usr/share/lmod/lmod/modulefiles/Core -------------------------------------------------------
To add a module, you will need to run modules load [insert module here]:
[djgreen@godhand matlab]$ module load matlab/r2021a
To see which modules you currently have loaded, you will need to run modules list:
[djgreen@godhand matlab]$ module list
Currently Loaded Modules:
1) matlab/r2021a
Instead of typing exit to unload the module, you will need to run module unload [insert module here]:
[masumme2@godhand ~]$ module unload ansys/ansys2021r1
prepend / attach commands:
The old Linux environment also included the “prepend” and “attach” commands. These are no longer available. The first was just an alias,
Anyone using prepend in a script can add the following:
function prepend() {
export PATH=$2:$PATH
}
In tcsh it’s weirder:
alias prepend 'if (-d \!:2) if ("$\!:1" \!~ *"\!:2"*) setenv \!:1 "\!:2":${\!:1}'
The “new” add command has these builtin to allow these commands in older .environment files in our software lockers to continue to function as they are.
Rclone and Your Google Drive
The rclone client (https://rclone.org/docs/) is pushed to all ECE workstations. This software makes it very easy for you to access your NCSU Google Drive to copy files on or off your local Linux workstation -- and makes a great way for you to backup your data -- remember, you have unlimited space in your Google Drive.
[setup instructions]
[encrypting setup to avoid others using]
[sample commands]
References:
Using GitHub Repositories
If you’re not already, you need to start using the campus GitHub service to store and work on all of your code for both courses and your research:
Recommended (free) clients:
- Github Desktop: https://desktop.github.com/
- Tower: https://www.git-tower.com/students/
Using Singularity and Containers
As a department, our interest in machine learning and deep learning applications has increased dramatically over the past couple years, as has our usage of GPU driven applications. Many of these open source applications require very specific libraries or versions of libraries to be installed on the operating system -- these don't always match the needs of other applications, and are often newer than the default libraries provided by our RedHat Enterprise or Ubuntu LTS operating systems.
Trying to install these applications manually, and worse, trying to then keep them updated for some users but not for others, has proven to be impossible to maintain.
For this reason, we have started deploying application containers -- self contained applications which include all of the libraries needed to run them -- that we can run on either OS, and can be kept in place as long as needed without stopping us from simultaneously providing the newest versions of these applications to those working on the bleeding edge.
We will be using Nvidia's GPU Cloud as the core source of these packages to begin: https://ngc.nvidia.com/catalog/containers
We have deployed the "singularity" client to all ECE computers; we will use this to run these containers without requiring the user have sudo/admin rights on the box (one of the drawbacks and reasons we're not using docker instead). It should be noted that the campus HPC is also looking at deploying singularity to its systems, so a container you use on your workstation or the HYDRA farm, could later be used on a hundred nodes in the HPC, scaling up your research without needing to recode anything.
On the HYDRA and GRENDEL farms, you will now find a /containers directory with the initial batch of containers. Many of our initial containers expect a GPU card, so you won't find the same containers available on both server farms.
We are just starting to learn how best to use containers, but we can point out documentation for those who want to become advanced users (https://www.sylabs.io/guides/2.6/user-guide/) and have provided basic commands below.
(Note: all containers are kept in /containers on the HYDRA and GRENDEL servers. Just cd to that directory and look around to see what’s currently available.)
To inspect the metadata on a container, type
singularity inspect singularity-container-name.simg
This may be very limited information on some containers, on others, will provide version numbers for all applications within.
To start the Singularity image and then fire up a shell, type
singularity shell --nv singularity-container-name.simg
where
--nv gives your container GPU support
singularity-container-name is the container you wish to use
Type any commands you like at the prompt.
Alternately, you can create a bash shell script and run it inside of the container. To do so, once your interactive session has started, type
singularity exec --nv singularity-container-name.simg bash_script.sh
where:
--nv gives your container GPU support
singularity-container-name is the container you wish to use
bash_script.sh is your bash script
As all NGC containers are optimized for NVIDIA GPU acceleration we will always want to add the --nv flag to enable NVIDIA GPU support within the container when using any containers in /containers/ngc/. Please note that you must have a Pascal (https://en.wikipedia.org/wiki/GeForce_10_series) or Volta (https://en.wikipedia.org/wiki/Volta_(microarchitecture)) or Turing (https://en.wikipedia.org/wiki/Turing_(microarchitecture)) series of GPU to run these containers.
If there are additional applications which you'd like made available via a container, or if there's a newer version of a specific container that you'd like to use, please send a request to ecehelp@ncsu.edu (and specify if you need it on GRENDEL, HYDRA, or both). We can create a singularity container from any publicly available docker container repository.
Fixing SSH keys
Everyone once in a while you may come across the following when ssh’ing into an ECE computer:
@@@@@@@@@@@@@@@@@@@@@@@@@@@@@@@@
@ WARNING: REMOTE HOST IDENTIFICATION HAS CHANGED! @
@@@@@@@@@@@@@@@@@@@@@@@@@@@@@@@@
IT IS POSSIBLE THAT SOMEONE IS DOING SOMETHING NASTY!
Someone could be eavesdropping on you right now (man-in-the-middle attack)!
It is also possible that a host key has just been changed.
The fingerprint for the ECDSA key sent by the remote host is
SHA256:kBsL/Ibjw1PxwSZ5sdfdfsfsdfliN/NV5yO+QYXI/Er3XM0.
Please contact your system administrator.
Add correct host key in /Users/unityid/.ssh/known_hosts to get rid of this message.
Offending ECDSA key in /Users/unityid/.ssh/known_hosts:1
ECDSA host key for hostname.ece.ncsu.edu has changed and you have requested strict checking.
Host key verification failed.
Most often this is telling you that the computer has been reinstalled since the last time you logged into it. If that’s likely, then all you need to do is remove the reference to the computer in the file mentioned above and then try ssh’ing again. Or you can run the following command:
ssh-keygen -R hostname.ece.ncsu.edu
This will clear the old key out without you having to find it in the file.
Screen
Screen or GNU Screen is a terminal multiplexer. In other words, it means that you can start a screen session and then open any number of windows (virtual terminals) inside that session. Processes running in Screen will continue to run when their window is not visible even if you get disconnected.
You can use screen by running the following command:
$ screen
If you lose your connection to the server for whatever reason, you can regain the session by logging back into the server and using the following command:
$ screen -r
Anaconda 101
For those of you using machine learning, one of the critical applications you need to learn to use correctly is Anaconda. This will allow you to run a custom python installation within your user environment which is separate from the system installed python and often newer -- which you’ll find is important for the numerous Machine Learning (ML) and Deep Learning (DL) applications that you want to run (like TensorFlow, for example). Sometimes you just need something newer than the default python version that installed with the system; other times you’ll need a very specific version for what you’re running.
Plus anaconda includes the conda package management utility which will allow you to easily install many of the ML applications that you want and will automatically install all of their dependencies at the same time (within anaconda) so what would have been 3hrs of installing a dozen different pre-reqs becomes just one line of code.
(sidenote: avoid pip whenever possible -- you will find a ton of online ML documentation telling you how to install their software using the pip system… try using anaconda before you do)
Installation
You can download Anaconda here: https://www.anaconda.com/distribution/#download-section
Select your OS, then if you want the Python3 or Python2.7 version. Download to your home directory and install it there.
./Anaconda3-2019.03-Linux-x86_64.sh
If you cannot execute it, first run:
chmod +x Anaconda3-2019.03-Linux-x86_64.sh
(update with the correct name of the file)
Please note that a> you can install anaconda within your user home directory (which is what we want) and b> you don’t need administrative privileges to install it.
Your only constraint might be space -- so machines where your home directory is your AFS space (which NCSU only provides 10GB of) might have some issues with this as anaconda will want to use all of that 10GB of space. But outside of teaching lab systems or remote access servers, you should find that your research workstations all use local storage now for your home directories.
When installing, go ahead and have anaconda setup its initialization scripts (but see below).
Don’t Start in Anaconda by Default
Last login: Mon Jul 22 18:40:18 2019 from rampart.ece.ncsu.edu
(base) [djgreen@timeflip ~]$
The first thing you’ll notice after you install anaconda (and either logged out and back in OR ran “source ./.bashrc”) is that your prompt changes to the one above.
This indicates that you’re within the anaconda environment… but you don’t want this to be your default. This can break things -- access to your Gnome environment is a common one.
Run the following command:
conda config --set auto_activate_base false
Log back out / in and you’ll find your prompt back to normal. From now on, conda is in your path, but its not running by default.
To enter the conda env, run “conda activate” and to exit, run “conda deactivate”
User, not System Packages
[need docs]
Create Conda Environments
Need to install tensorflow?
conda create --name tf_gpu tensorflow-gpu
This is the same as running:
conda create --name tf_gpu
conda activate tf_gpu
conda install tensorflow-gpu
Updating Conda
In most cases what you want to do when you say that you want to update Anaconda is to execute the command:
conda update --all
If you are only interested in updating an individual package then from the command line:
conda update astroid astropy
However, Your root environment is probably not a good place to try and manage an exact set of packages—it is going to be a dynamic working space with new packages installed and packages randomly updated. If you need an exact set of packages, create a conda environment to hold them. Thanks to the conda package cache and the way file linking is used, doing this is typically fast and consumes very little additional disk space. For example:
conda create -n myspecialenv -c bioconda -c conda-forge python=3.5 pandas beautifulsoup seaborn nltk
Recommended Reading
- https://towardsdatascience.com/a-guide-to-conda-environments-bc6180fc533
- https://conda.io/projects/conda/en/latest/_downloads/1f5ecf5a87b1c1a8aaf5a7ab8a7a0ff7/conda-cheatsheet.pdf
- https://towardsdatascience.com/tensorflow-gpu-installation-made-easy-use-conda-instead-of-pip-52e5249374bc
Educational Videos
Uninstall
One of the nice things about installing anaconda in your home directory is that it's incredibly easy to uninstall it… just delete the directory. Open a terminal window, and then remove your entire Anaconda directory, which has a name such as anaconda2 or anaconda3, by entering:
rm -rf ~/anaconda3
Also, remove the conda initialize code from your .bashrc
# >>> conda initialize >>>
# !! Contents within this block are managed by 'conda init' !!
__conda_setup="$('/home/djgreen/anaconda3/bin/conda' 'shell.bash' 'hook' 2> /dev/null)"
if [ $? -eq 0 ]; then
eval "$__conda_setup"
else
if [ -f "/home/djgreen/anaconda3/etc/profile.d/conda.sh" ]; then
. "/home/djgreen/anaconda3/etc/profile.d/conda.sh"
else
export PATH="/home/djgreen/anaconda3/bin:$PATH"
fi
fi
unset __conda_setup
# <<< conda initialize <<<
add anaconda3
There is an installation of anaconda in AFS which you can add to your environment as an alternative to local installation -- “add anaconda3”
The advantage of this installation is that you can minimize the space needed -- for example, you could use this on our HYDRA or GRENDEL remote access systems where your AFS quota is quite small.
Courses are likely to be the largest user of this option.
The following steps, for example, would allow you to call the application into your environment, create a conda environment, activate it, and then add additional anaconda packages (qiskit) to your local storage that’s not provided through the “add” install:
add anaconda3
conda create -n ece792-046
(creates new env in ~/.conda/envs/ece792-046)
source activate ece792-046
#now install what you need
pip install qiskit --user
miniconda
We’ve found that anaconda versions can greatly impact your install, so sometimes the version in AFS isn’t new enough… this is where miniconda might be helpful. It’s the tiniest version of Anaconda and you can install it in your AFS home space.
First you need to download the latest version from https://docs.conda.io/en/latest/miniconda.html#linux-installers
I recommend heading there, copying the link, then using wget to grab it…
wget https://repo.anaconda.com/miniconda/Miniconda3-py39_4.10.3-Linux-x86_64.sh
bash Miniconda3-py39_4.10.3-Linux-x86_64.sh
Follow their instructions… go with the defaults. It’ll want to install to /afs/unity.ncsu.edu/users/d/djgreen/miniconda3 (replace d/djgreen w/ your path), which is fine.
I would recommend that unless you’ll be using it alot, to not add it to your environment by default. In which case, you can activate it with the following command:
eval "$(/afs/unity.ncsu.edu/users/d/djgreen/miniconda3/bin/conda shell.bash hook)"
(yes, its a mouthful and be sure to fix that path for yours)
Alternatively, have it add it, but then immediately run the following command to have it present but disabled by default
conda config --set auto_activate_base false
(ok, the alternative option is probably going to be saner in the long run)
GPU Resources
If you need access to GPU resources for your work, you have multiple options to explore:
HYDRA
See our section above for details on this farm of servers.
VCL
Starting in the 2019 fall semester, VCL now offers a pilot program with some limited access to VMs with GPUs attached. Currently, VCL only supports having a single GPU attached to a VM. There are 2 Tesla P100 GPUs and 4 Grid K2 GPUs available. Reservation durations may be more strictly time limited than other reservations due to the limited number of GPUs available.
To obtain access to the GPU enabled VMs, use the help support form to request access and explain your use case. Also, if use is for a project or course, please include the professor and/or course number.
See https://vcl.ncsu.edu/get-help/documentation/gpu-enabled-vms-in-vcl/ for more information.
HPC
Here is the Quick Start Tutorial
https://projects.ncsu.edu/hpc/Guide/
HPC Learning / Training Materials:
https://projects.ncsu.edu/hpc/Documents/hpc_links.php
And HPC Office hours are here:
https://projects.ncsu.edu/hpc/Documents/UserTraining.php#hours
Details on Anaconda usage on the HPC:
https://projects.ncsu.edu/hpc/Software/Apps.php?app=Conda
New HPC Video Series:
- Essential Linux - Fluency Drill:
- HPC Acceptable Use Policy:
- Basic HPC Workshop (Introduction):
- Basic HPC Workshop (Storage and File Systems):
- Basic HPC Workshop (Running Jobs):
- Basic HPC Workshop (Parallel Jobs):
Research Servers
Check with your advisor to see if they have purchased a server that includes GPUs within them for their research team. These systems will be limited to a particular research group and might be more useful to you than one of these other options.
AWS
As an NC State student, you can make use of free credits that are provided to our students. All of our students are eligible for the AWS Educate program. By default, this program provides $40 in free AWS credits to students across the globe, but because NC State has enrolled as a member of the AWS Educate program. Because of this, our ECE students will actually get $100 per year in free credits.
$100 in credits should be more than enough for most course projects (provided you turn the systems off when not needed). And the credits only come into play should the students be doing something that exceeds the free tier at AWS (for folks using AWS for the first time).
How do you sign up?
- Create an AWS account using your unityID@ncsu.edu email address. This is required.
- Once created, visit the AWS Educate site and register under the student role: https://www.awseducate.com/registration
You’ll get an email within 24-36hrs with a voucher for the free credits. You’ll need to monitor your usage to make sure you don't spend beyond that or it comes out of your pockets.
---
Now, if you think that you'll have a need beyond this where you'd want to cover the costs on a researcher’s NC State account, then we can create a special AWS account for the professor, then register it through the campus Internet2 contract for AWS services. Any fees charged to that account can then be automatically charged to a departmental account each month. Our contract also waives all in/out data transfer fees into AWS.
FYI: Amazon's Machine Learning University is making its online courses available to the public -- classes previously only available to Amazon employees will now be available to the community:
Software Collections
In order to provide ECE staff and students with the latest industry standards, we’ve installed three packages that provide updated versions of gcc, Python and other development tools on our RHEL systems. The packages installed include devtoolset-8, python27 and python36. These packages allow for development with newer compilers and code versions without interfering with the existing system installations.
scl -l will list all collections installed on your system.
As an example, you can use Python3.6 in a Bash shell with the following command:
scl enable rh-python36 bash
Or enable gcc 8.3.1 with the following command:
scl enable devtoolset-8 bash
If you need to use both, you can call both at the same time:
scl enable rh-python36 devtoolset-8 bash
For a full list of features and User Guides please see the links below:
- https://access.redhat.com/documentation/en-US/Red_Hat_Developer_Toolset/
- https://access.redhat.com/documentation/en-US/Red_Hat_Developer_Toolset/1/html-single/Software_Collections_Guide/index.html
Appendix A: No Tokens at Login (GSSAPI issue):
When connecting to a campus Linux machine from another campus Windows machine, you may find that the Linux machine doesn’t ask for a password, and automatically logs you in -- but that you don’t have valid AFS tokens.
(note, this will ONLY occur on campus machines joined to the WolfTech Active Directory domain -- this does not impact personal computers connecting to campus Linux machines)
Technical Background
Here's a KB article from MIT on the subject that explains Kerberos authentication vs delegation: http://kb.mit.edu/confluence/pages/viewpage.action?pageId=4981397
In short, you can use kerberos to authenticate to a machine using GSSAPI but NOT delegate your credentials cache to the remote machine.
When you do this, the remote server knows who you are, but does not create a credentials cache for your new session. As such, if you do not delegate your credentials, then you will have NO cache and since you have no cache, aklog will fail to retrieve AFS tokens.
Fixing your Clients
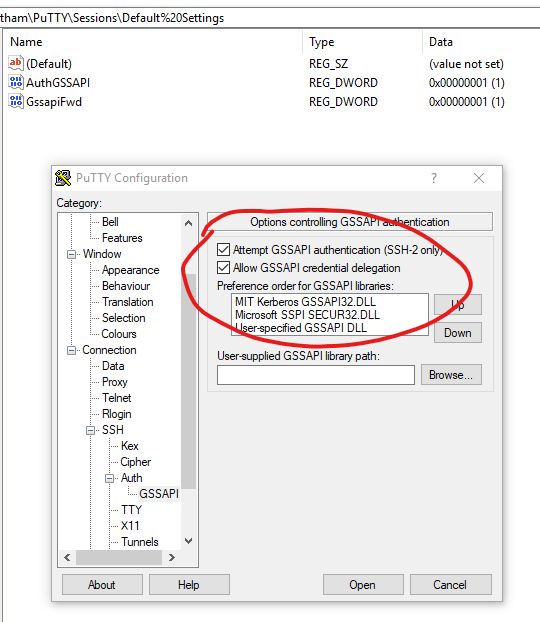
If using Putty, open the client and create a new session after enabling the following configurations:
Connection > SSH > Auth > GSSAPI -> "Attempt GSSAPI authentication (SSH-2 only)" (enabled, by default)
Connection > SSH > Auth > GSSAPI -> "Allow GSSAPI credential delegation" (*disabled*, by default)
If you’re using MobaXterm, click Settings > Configuration, and uncheck “GSSAPI Kerberos”:
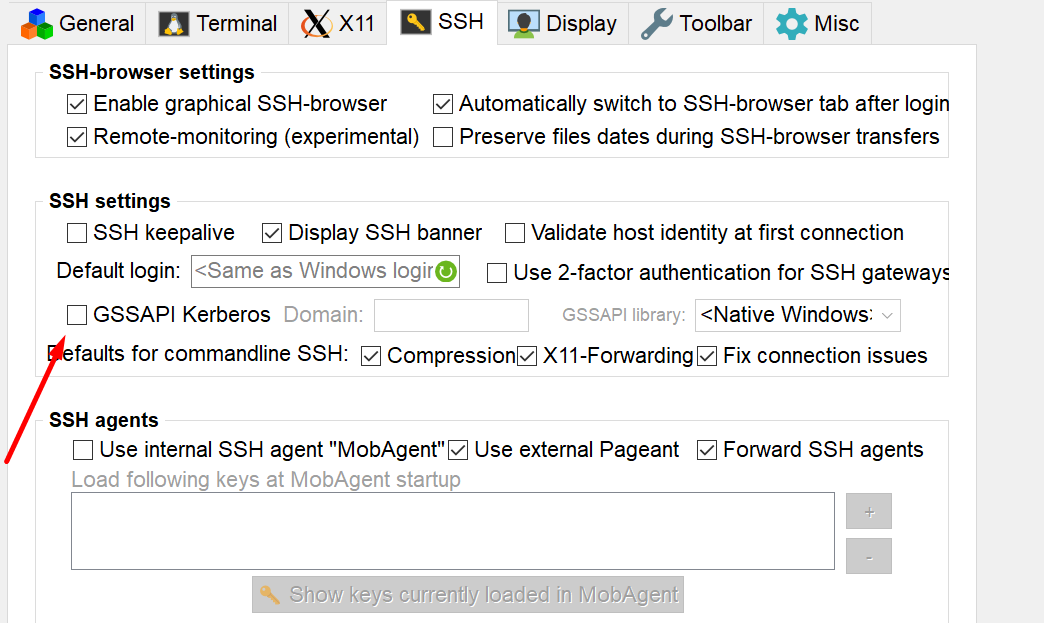
Making these changes should force the ssh client to request your password as it has in the past. And once logged into the remote computer, you should find that you have valid AFS tokens.
Appendix B: Standard Dot Files
In new environment, no cmd to reset these to their defaults -- need to consider creating one.
Default .cshrc
[klmorr22@grendel2 ~]$ more .cshrc
################################################################################
# #
# .cshrc file (initial setup file for C-Shells) #
# #
# WARNING: PLEASE READ THE REST OF THIS FILE BEFORE MAKING ANY CHANGES !!! #
# #
################################################################################
if (-d /usr/athena/lib/skeleton) then
set skeleton=/usr/athena/lib/skeleton
else
set skeleton=/afs/bp.ncsu.edu/system/common/skeleton
endif
if (-r $skeleton/cshrc) then
source $skeleton/cshrc
else
if ($?prompt) then
echo "WARNING: System-wide initialization files were not found."
echo " C-Shell initialization has not been performed."
endif
set path = (/bin $HOME/bin /usr/local/bin /usr/bin/X11 /usr/athena/bin \
/usr/afsws/bin /usr/ucb /usr/bin .)
limit coredumpsize 0
set prompt="eos% "
set ignoreeof
umask 077
alias rm rm -i
endif
if ($?XSESSION) then
if (-r /usr/athena/bin/end_session) alias logout '/usr/athena/bin/end_session && exit '
if (-r /usr/bin/end_session) alias logout '/usr/bin/end_session && exit '
endif
################################################################################
Default .bashrc
[klmorr22@grendel2 ~]$ more .bashrc
# .bashrc
# Source global definitions
if [ -f /etc/bashrc ]; then
. /etc/bashrc
fi
# Uncomment the following line if you don't like systemctl's auto-paging feature:
# export SYSTEMD_PAGER=
# User specific aliases and functions
Default .bash_profile
[klmorr22@grendel2 ~]$ more .bash_profile
# .bash_profile
# Get the aliases and functions
if [ -f ~/.bashrc ]; then
. ~/.bashrc
fi
# User specific environment and startup programs
PATH=$PATH:$HOME/.local/bin:$HOME/bin
export PATH
Default .login
[klmorr22@grendel2 ~]$ more .login
################################################################################
# #
# .login file (terminal setup file) #
# #
# Note: This file is only read once after the .cshrc file when log in. #
# It will not be read again for subsequent shells. #
# #
# WARNING: PLEASE READ THE REST OF THIS FILE BEFORE MAKING ANY CHANGES !!! #
# #
################################################################################
if (-d /usr/athena/lib/skeleton) then
set skeleton=/usr/athena/lib/skeleton
else
set skeleton=/afs/bp.ncsu.edu/system/common/skeleton
endif
if (-r $skeleton/login) then
source $skeleton/login
else
if ($?prompt) then
echo "WARNING: System-wide initialization files were not found."
echo " Login initialization has not been performed."
endif
stty dec
switch ($term)
case xterm:
setenv DISPLAY unix:0
set noglob; unsetenv TERMCAP; eval resize; unset noglob
breaksw
default:
set term=vt100
setenv TERMCAP /etc/termcap
breaksw
endsw
setenv TERM $term
endif
################################################################################
# #
# If you would like to modify the login initialization sequence, please #
# make the changes in a file called .mylogin located in the top level #
# of your home directory. Your ~/.mylogin file is used only to set up #
# your terminal type. For other customizations, please refer to the #
# comments in your default ~/.cshrc. #
# #
# WARNING: Any changes in this file may disappear one day when the system #
# is updated! Make sure you know what you are doing!!! #
# #
################################################################################
Default .logout
[klmorr22@grendel2 ~]$ more .logout
clear
date